Creating your own nest camera system using Unraid and Shinobi

With all of the huzaa around internet-connected cameras, I thought I would configure my own system that is firewalled off from the internet and uses local storage. This should hopefully keep my data private and limit access to only people who have access to my network.
Below is a guide to a setup I will be using. I brought 2 Reolink RLC-420-5MP cameras a POE switch and will be using a VM to record events and notify me via Discord when it detects motion. This comes to an upfront cost of around £160. But seeing as I won’t be paying for storage and I can keep the videos as long as I want I should save in the long term as well as being more secure.
Creating your Server and Database set up
This is one of the most complex bits so we will start here. 99% of this part I will be copying from the shinobi website bar one crucial command which took me a day to figure out stupidly.
Ok, the first thing we need to do is create a VM for this guide I will be using Unraid, Normally I would use a docker from Community applications. However, both the Shinobi dockers on community applications do not have the Discord module enabled (This also took me too long to figure out!)
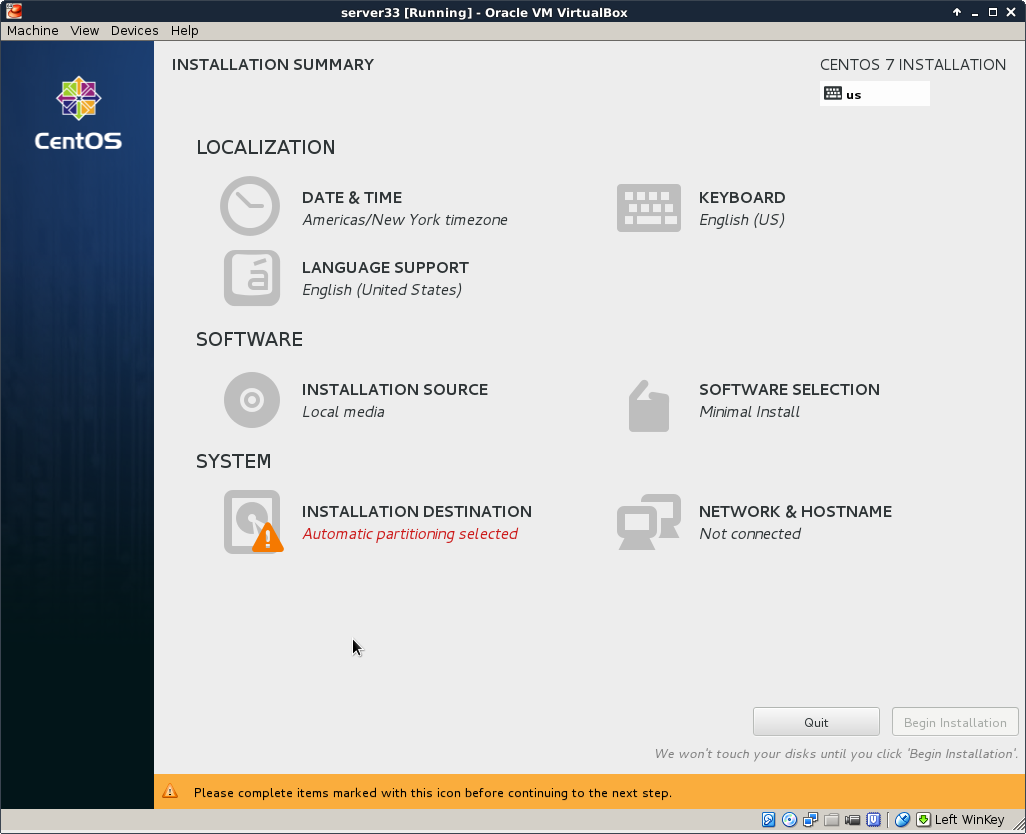
The first thing you need to do is download a copy of CentOS 7 (Not 8 it will not work with 8 and if you try you will just waste your time) you can do that here. When you have downloaded it move the iso into the Unraid ISO folder.
Then Log onto your Unraid Server Select the VM and then select Add VM and you will be greeted by the below screen.

Then select CentOS and you will be greeted by the below.

For 2 cameras enter the below values.
Description: Something descriptive to you
Logical CPU: Select at least 3 cores.
Initial Memory: At least 6GB of Ram
OS Install ISO: Select the ISO you downloaded
Primary vDisk Size: 500g
Start VM After Creation: unselect this is selected as the boot may time out before you get to it
Now Select Create. You should now be back at the VM creation page. Click on the icon for your new VM and start, Once it has started click again on the icon and select VNC Remote.
For the most part, The OS install is fairly self-explanatory there is one thing that makes life simpler
When you get to the Install config page make sure that you have network and hostname configured and on. It saves you time later.

On the next screen add your root password and then wait for the install to complete.
After you have set up your server, hop over to your Unraid server as we will need to install a database docker called MariaDB. This is important as I recently had an experience with shinobi when I rebooted Unraid to install an update the VM for shinobi did not shut down gracefully and corrupted the database. Having the database separate and in a system controlled docker should prevent this from happening.
Head over to the Unraid app section and search for “MariaDB”. And download it you will be presented with the below options.

Enter a password for the SQL root user and hit apply.
Now its time to run some commands! SSH into your server and run the below.
Sudo su
Enter your admin password
Cd ~
sudo yum update -y
sudo yum install curl -y
curl --silent --location https://rpm.nodesource.com/setup_8.x | bash -
sudo yum install nodejs npm -y
yum install git -y
git clone https://gitlab.com/Shinobi-Systems/Shinobi.git Shinobi
cd Shinobi
chmod +x INSTALL/centos.sh && INSTALL/centos.sh
Do you want to enable superuser access: Yes
Do you want to install FFMpeg: Yes
Do you want to Install FFMPEG with yum or download a static version provided with npm: NPM
Do you want to Install MariaDB? No ( we will be using the docker we created earlier.)
Database Installation: No
sudo systemctl disable firewalld
(this is important as communications would be blocked if you leave the firewall in place, As mine is behind a firewall and is not accessible behind it the firewall on this server is not really useful otherwise you will need to create local rules if you wish to leave this on. I will be going over firewall rules after we have finished doing the initial set up on the server.)
Now we need to configure shinobi to use a remote server
First, we need to point Shinobi to the database server
Vi /root/Shinobi/conf.json
Find the line with host and change that to the IP of the server that you installed MariaDB on.
Next, we need to copy the config files from the GIT here. Download framework and user, when you have them downloaded open the user file with a text editor and edit the IP shown to the IP of the server we have created. Once done move them to /mnt/user/appdata/mariadb on the server you installed your MariaDB docker on.
Now on your Unraid server go to docker and click on the MariaDB icon and select console and run the below commands.
Mysql
source config/sql_framework.sql;
source config/sql_user.sql;
Reboot and you should now be able to log into your shinobi by entering the (IP of the server):8080/super
Username : [email protected]
Password : admin
This will allow you to create an account for you to use and change the admin password. Which is conveniently the 1st page we will get to this later.
Setting up video backup
Next, we need to set up an nfs share and connect that to this server to back up videos in the event the VM goes tits up.
Create a share called ShinobiVideo on your Unraid box, under the NFS settings for the share enter the below
Export: Yes
Security: Private
Rule: <IpOfShinobiServer>/24(sec=sys,rw)
Now run the below commands
Sudo yum install nfs-utils -y
Sudo mkdir /mnt/shinobivideo
Sudo vi /etc/fstab
And add the below line
<IpOfServer>:/mnt/user/ShinobiVideos /mnt/shinobivideo nfs defaults 0 0
Then run
Sudo mount -a
Now we need to install rclone to sync the data between the stored videos on the server and your Unraid Server
First install 7z with the below commands
Sudo yum install -y wget
sudo wget https://www.mirrorservice.org/sites/dl.fedoraproject.org/pub/epel/7/x86_64/Packages/p/p7zip-16.02-10.el7.x86_64.rpm
sudo wget https://www.mirrorservice.org/sites/dl.fedoraproject.org/pub/epel/7/x86_64/Packages/p/p7zip-plugins-16.02-10.el7.x86_64.rpm
sudo rpm -U --quiet p7zip-16.02-10.el7.x86_64.rpm
sudo rpm -U --quiet p7zip-plugins-16.02-10.el7.x86_64.rpm
Then we can install rclone with the below
curl https://rclone.org/install.sh | sudo bash
Now we create the cronjob to sync the files enter the below
Crontab -e
Then add the below line to the file that opens
*/30 * * * * rclone sync /root/Shinobi/videos /mnt/shinobivideo
Port changes and SSL installation
The last part of the software set up is to create and download an SSL cert to the server. As I use PfSense for my local servers I will be generating a cert from there.
Download your .crt and .key files from PfSense and change them to be .pem files so that they look something like Shinobicrt.pem and Shinobikey.pem. Copy these files to /root/Shinobi.
Log in to the superuser panel <servername\ip>:8080/super and select the configuration tab. Above the add storage line add the below.
"ssl": {
"key": "/root/Shinobi/Shinobikey.pem",
"cert": "/root/Shinobi/Shinobicrt.pem",
"port": 443
},
Also, find where it says port 8080 and remove an 80. This will let you access you http and https without having to specify the port in your address. There is a reason why we are leaving the unencrypted traffic enabled but I will come to that later.
You will need to add a DNS entry to match the information you put in your SSL cert.
Installing Discord Module
Lastly, we need to install the Discord notification app. Follow the commands below.
Cd /root/Shinobi
npm install discord.js
node tools/modifyConfiguration.js addToConfig=''
pm2 restart camera.js
Now we are done with the linux portion of this exercise
Configuring your Shinobi Server User

Log into the superuser panel for shinobi <servername\ip>/super I use the below settings for my user.
E-mail: Your e-mail
Password: set to the password you wish to use
Storage: value in MB to use
Days to keep videos/events/logs: keep these the same I have mine set to 30
Permissions: all privileges
Configuring your Cameras
Before I proceed make sure you set up your cameras. Have the user names and passwords set up and go through setting to get them set up as you want resolution / watermarks / encoding/ etc. I have my cameras set up in a separate VLAN so I need to have the below firewall rule set up.
Ports: 9000, 80, 443, 554, 1935, 8000, 22
Protocol: TCP/UDP
Destination: Your Cameras, Servers, and devices that need access to this system.
Enter just the address / IP address of your server without the super and log into your server using the credentials you created earlier. Find the three horizontal lines and click on this to reveal the side menu. From here click on your user name to reveal the menu.

From here select ONVIF.

I have found that entering the IP range does not work. Enter the IP of your camera username and password and then search. You should have your camera pop up in the left.

Click on the copy icon on the left and a new window will open. Edit the below values.
Name: Name you wish your camera to have
Audio Codec: Copy
Jpeg API: Yes
Framerate: 1
Image Width: Same as your camera
Image Height: Same as your camera
Repeat this with all your cameras.
Now to configure motion detection. When you mouse over one of the cameras click on the little spanner and the settings menu will appear. In the bottom right there is a drop-down that says simple, click it and select advanced.
Find global detector settings on the right and click. Now change the below settings.
Enabled: Yes
Save Events to SQL: Yes
Timeout Reset on Next Event: Yes
Delay for Snapshot: 2
Discord Alert on Trigger: Yes
Attach Video Clip: No
Now for Motion Detection settings.
Indifference: 8
Full Frame Detection: Yes
Lastly Traditional Recording.
Video Encoder: Copy
Audio Encoder: Copy
Now we can copy those settings to your other cameras. find copy settings on the left-hand side and select it and do the below.
Copy to Settings: Yes
Copy Detector Settings: Yes
Then select your cameras and hit save and camera set up is done.
Discord Set-up
Instead of copying and pasting, I will just refer you to the official documentation this part was really well done.
How to setup Push Notifications with Discord Bot API
Finishing up
To view your cameras on your iPhone/android simply go to the same address that you would use for your browser.
For iPhone users adding it to your home screen makes it act like an app. However, an additional step is required to view the videos. Instead of the three horizontal lines, you have a box tap this and then tap your username its a bit iffy right now but the right tap will bring up the menu. Scroll down on this and enable JPEG Mode. This will allow you to see cameras and feeds.
The reason for this is because for the moment iPhones do not support the web streaming method currently used by shinobi. This is the reason we enabled JPEG mode earlier. iPhones are also the reason that we left port 80 enabled as even when you add your CA to the iPhone safari does not like https and shinobi.
Also with Discord right now you will only receive a text notification when a motion event is triggered. This is a good thing as Tencent that owns discord could potentially get hacked the only thing that a hacker would get it text saying motion was triggered not a Pic of the motion or if you selected it a video of whatever that motion was.