Turning Your Computer On And Off Using Homekit

This will be a guide on how I used a Raspberry Pi 3A and Homekit to turn my windows computers on and off, If you have a Homekit hub (Apple tv 4th gen or Homepod) you can perform these functions remotely.
Parts List
You will need the below parts to do this setup.
Raspberry Pi 3a (case optional)
USB A Ethernet adapter
7W USB Power adapter
Micro SD card
Setting up your Pi
This is fairly simple, Download the Raspbian Lite image from here. From here we need to flash this to your Micro SD card following the guide provided by Raspberry Pi here.

Before you eject your SD card we need to add a file to the root directory of the card called ssh.txt . This will enable SSH on the PI without having to connect a keyboard and mouse.
The last part of the setup is to find a place for this device to sit, Connect an ethernet cable to your adapter then connect the adapter to your Pi, if you have different Vlans the Pi will need to be on the same Vlan as your computer(s). Plug in the SD card then power adapter and let your PI boot.
Setting up Homebridge

From here we will be using Putty to connect to the PI and get Homebridge configured. Find the address assigned to your PI using DHCP. It will need to be given a static IP otherwise every reboot or DHCP refresh Homekit will lose its connection.
When connecting to the PI the default username is pi and the password is raspberry.
As with all fresh installs it is customary to update the OS and packages this is done by running the below commands.
Sudo apt-get update
Sudo apt-get upgrade
Select yes to any presented prompts
Now you can proceed to installing Homebridge. Run the below commands to get this done.
curl -sL https://deb.nodesource.com/setup_12.x | sudo bash -
sudo apt-get install -y nodejs gcc g++ make python
sudo npm i -g npm
sudo npm install -g --unsafe-perm homebridge homebridge-config-ui-x
sudo hb-service install --user homebridge
sudo apt-get install samba-common
That’s it for the setup, Homebridge is now installed and set up to run on boot.
Configuring your computer for remote Boot/Shutdown
1st thing that needs to be configured is to enable the WOL feature of your computer’s motherboard. This will vary for different computers so consult the manual for your motherboard for the location of this setting from within the BIOS.
Now boot into windows and login you will need to make the below changes. If you have a domain these can be applied by group policy otherwise you can apply them on a per-computer basis.
User Account

Open the start menu and search for “computer management” and open it when windows finds it.
Select Local users and Groups, Expand this and open Users.
Add a new user by right-clicking > New User, Give this the Username shutdown.
Do not give this any permission other than “User”.
You can now close Computer Management.
Now open the start menu and search for “local group policy” and open it. Then navigate to.
Computer Configuration > Windows Settings > Security Settings > Local Policies > User Rights management.
In here find “Force shutdown from a remote system” open this and click add user or group, Add the “shutdown” user we created earlier.
This will allow this user to shut down the system remotely without giving it administrator permissions.
Windows Firewall

Open the control panel and find “Windows Defender Firewall”. On the left-hand side click on “Allow an app or feature through Windows Defender Firewall”. Now Change settings and select the below and allow them on private connections.
Remote Service Management
Remote Shutdown
Windows Management Instrumentation (WMI)
Lastly open an admin CMD window and paste the below command.
netsh advfirewall firewall add rule name="ICMP Allow incoming V4 echo request" protocol=icmpv4:8,any dir=in action=allow
Services
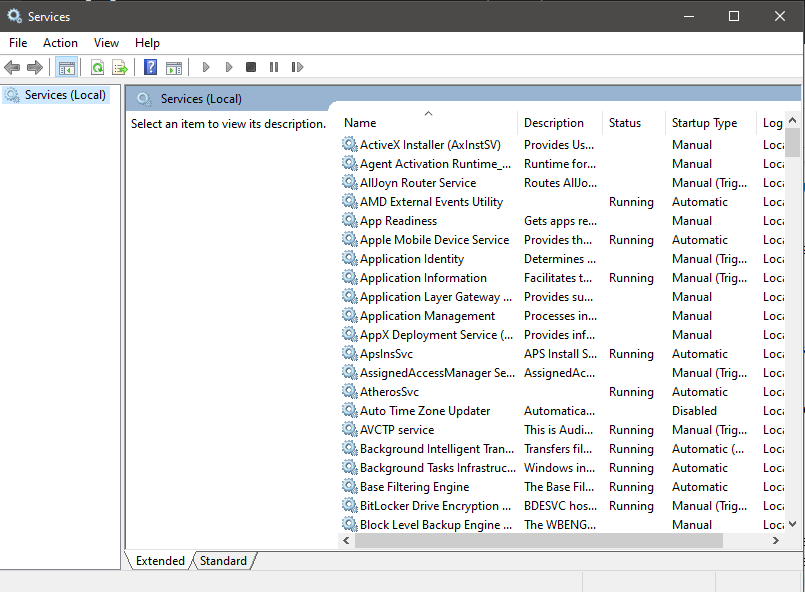
The last configuration item that needs changing is to enable 2 services. Open the start menu and search for “Services”. Find the below services and change them to start type: Automatic and start them if they are not already started.
Remote Registry
Windows Management Instrumentation
With this, Windows is now ready to be shut down remotely and your computer is ready to be woken remotely. The last thing we need to do is get Homebridge set up to trigger these actions.
Homebridge config

Now its time to log into Homebridge and configure it to send the commands we want to our Windows PC’s. In a browser enter the below into the address bar.
http://<ip of pi>:8581
This Will present you with a login screen the username and password are both admin. After logging in you will be shown the Homebridge’s status page. From here look at the top and select plugins.
In the search bar enter WOL and press Enter. It should bring up Homebridge WOL, Click on install and the Plugin will be installed.
Now click on config on the top bar. This will allow us to create the accessory and set it up for your computer. It will look like the below.
{
"bridge": {
"name": "HomebridgeRPi",
"username": "**:**:**:**:**:**",
"port": *****,
"pin": "***-***-***"
},
"accessories": [ ],
"platforms": [
{
"name": "Config",
"port": 8581,
"platform": "config"
}
]
}
Change this to look like. Where * are replaced with the values for your system and the devices you want to be configured i have put 2 devices in you can add more or less depending on what you wish.
{
"bridge": {
"name": "HomebridgeRPi",
"username": "**:**:**:**:**:**",
"port": *****,
"pin": "***-***-***"
},
"accessories": [
{
"accessory": "NetworkDevice",
"name": "***",
"mac": "*:**:**:**:**:**",
"ip": "*.*.*.*",
"pingInterval": 45,
"wakeGraceTime": 90,
"shutdownGraceTime": 60,
"shutdownCommand": "net rpc shutdown -I 10.0.5.2 -U shutdown%**Password**"
},
{
"accessory": "NetworkDevice",
"name": "***",
"mac": "*:**:**:**:**:**",
"ip": "*.*.*.*",
"pingInterval": 45,
"wakeGraceTime": 90,
"shutdownGraceTime": 60,
"shutdownCommand": "net rpc shutdown -I 10.0.5.2 -U shutdown%**Password**"
}
],
"platforms": [
{
"name": "Config",
"port": 8581,
"platform": "config"
}
]
}
Once you have done this hit the power button in the top right this will restart Homebridge with the configuration we specified. The last thing you need to do is add Homebridge to Homekit, Open the Home app on your iDevice. In the top right hit the + icon and select add accessory. Then Scan the QR code on the Homebridge status page this will add your buttons to your home and you can now use them to power on or off your windows computers. And if you have a Homekit bridge do this remotely and set up automation to do this as your leaving/arriving home.
EDIT
I have found out that the Gigabyte motherboard i own has some Quirks, if yours wont WOL download the Intel drivers and make sure you select “Intel Advanced Network services”. Then you should be able to enable WOL from Shutdown using the settings below
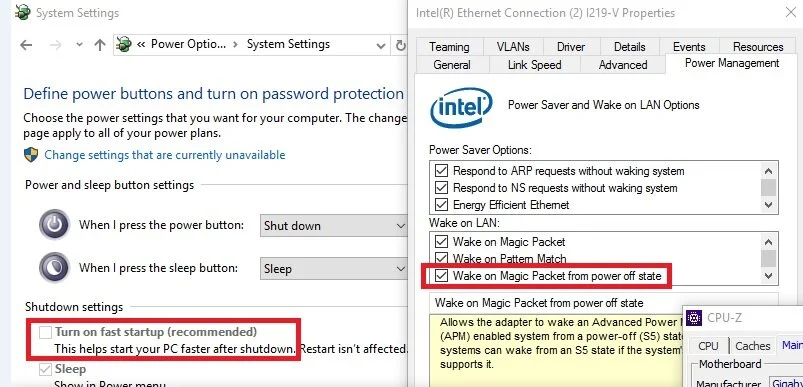
For some reason this needs to be applied to the NIC through the windows driver and not in BIOS. but this persists so you should only need to do it once.