Using Wireguard PFsense and Linode to get a Static IP for both inbound and outbound traffic
Some pretext before I begin, I have a home ISP and as such my IP changes every 24h ish. So for some things i would like to do like making my own phone server i would need a Static IP.
You will need a PFsense router to follow this guide. Also I will not be going through setting up security on your Linode that will be up to you whether you choose to use SSH keys or not.
Setting up your linode
Lets just start with why linode, I selected this cloud provider against others like Digital Ocean or Vultur because the pricing scales linearly you double your specs and it's only double the price. The other services can be 50% more.
Once you have set up your linode account head over to create and put in the following settings.

Images: Debian 11
Region: Select the one closest to your location
Linode Plan: Select shared CPU, Nanode 1 GB. (this gives 1TB of traffic per month if you want more select the plan to suit you)
Linode Label: I selected Wireguard1 but you can change this as you wish
Root Password: make sure this is strong as it gives you total control over the server
Private IP: Check this box
Hit Create Linode and your server will be built, for my server it took about 2 mins. Now grab the IP of your server and use that with putty to login to your server.
Once you have logged in run the below commands
apt update
apt upgrade
If there are any updates for your server this will grab them and update. Next run the below to install wireguard
apt install wireguard
Next we generate some keys to use with wireguard
cd /etc/wireguard/
umask 077; wg genkey | tee privatekey | wg pubkey > publickey
cat privatekey
cat publickey
Make note of the keys that are made as we will need them for the wireguard config next
nano /etc/wireguard/wg0.conf
This will bring up a text editor enter the below and add the private key you generated earlier next to PrivateKey.
[Interface]
Address = 10.1.0.1/24
ListenPort = 51830
PrivateKey =
PostUp = /etc/wireguard/up.sh
PostDown = /etc/wireguard/down.sh
[Peer]
PublicKey =
AllowedIPs = 10.1.0.2/24
PersistentKeepAlive = 25
Now hit ctrl+x this will them prompt you if you wish to save changes press y and then enter.
That script sets the below
Interface: Section for configuration of the server
Address: The IP address of the server in the VPN network
ListenPort: The port number WireGuard will run on
PrivateKey: The servers private key that we just generated
PostUp: Commands that will be run when the VPN server starts
PostDown: Commands that will be run when the VPN server stops
Peer: Section for configuration of clients
PublicKey: The public key of the client, which we have not yet created
AllowedIPs: The IP address of the client on the VPN network, which we will also configure on the client
Now we configure the firewall rules that are set when the connection comes up
Nano /etc/wireguard/up.sh
#!/bin/bash
iptables -A INPUT -i eth0 -p tcp --dport 443 -j ACCEPT
iptables -A INPUT -i eth0 -p tcp --dport 53 -j ACCEPT
iptables -A INPUT -i eth0 -p udp --dport 53 -j ACCEPT
iptables -A INPUT -i wg0 -j ACCEPT
iptables -t nat -A PREROUTING -i eth0 -p tcp --dport 443 -j DNAT --to-destination 10.1.0.2
iptables -t nat -A PREROUTING -i eth0 -p tcp --dport 53 -j DNAT --to-destination 10.1.0.2
iptables -t nat -A PREROUTING -i eth0 -p udp --dport 53 -j DNAT --to-destination 10.1.0.2
iptables -t nat -A POSTROUTING -s 10.1.0.0/24 -o eth0 -j MASQUERADE
iptables -A FORWARD -i wg0 -o eth0 -j ACCEPT
iptables -A FORWARD -i eth0 -o wg0 -j ACCEPT
iptables -P FORWARD DROP
Hit Ctrl-x and save this file
Ill detail what these rules are doing
iptables -A INPUT -i eth0 -p tcp(udp) --dport 443(53) -j ACCEPT
Accepts all incoming connections on the specified port and protocol
iptables -t nat -A PREROUTING -i eth0 -p tcp(udp) --dport 443(53) -j DNAT --to-destination 10.1.0.2
This alters the packers destination to enable it to route between networks correctly
iptables -t nat -A POSTROUTING -s 10.1.0.0/24 -o eth0 -j MASQUERADE
This alters the packets source address so the reply is sent to the correct address
iptables -A FORWARD -i wg0(eth0) -o eth0(wg0) -j ACCEPT
Allow traffic to be forwarded between eth0 and wg0 - in both directions
Now enter the following command and ether the below
nano /etc/wireguard/down.sh
iptables -D INPUT -i eth0 -j ACCEPT
iptables -D INPUT -i wg0 -j ACCEPT
iptables -t nat -D PREROUTING -i eth0 -p tcp --dport 443 -j DNAT --to-destination 10.1.0.2
iptables -t nat -D PREROUTING -i eth0 -p tcp --dport 53 -j DNAT --to-destination 10.1.0.2
iptables -t nat -D PREROUTING -i eth0 -p udp --dport 53 -j DNAT --to-destination 10.1.0.2
iptables -t nat -D POSTROUTING -s 10.1.0.0/24 -o eth0 -j MASQUERADE
iptables -D FORWARD -i wg0 -o eth0 -j ACCEPT
iptables -D FORWARD -i eth0 -o wg0 -j ACCEPT
iptables -P FORWARD DROP
Hit ctrl-x and then save your changes
This script is deletes all the rules created above when the tunnel is down
Now its time to enable ip forwarding
Nano /etc/sysctl.conf
Find the line in this file with net.ipv4.ip_forward and change it from 0 to 1. Hit ctrl-x and save your changes.
Lastly we need to open the firewall ports to allow wireguard to connect type the below
ufw allow 51830/udp
And your now mostly done with your server. Before we are done we need to setup the gateway on PFsense
Setting up and routing on PFsense
On your PFsense router login and go to VPN > Wireguard then in the lower right click add tunnel.

Now on this screen fill in the below
Description: fill in something meaningful to you
Interface Keys: click generate and then copy the public key somewhere safe
Then in the lower right click save tunnel

Now click on the peers tab and select add peer in the bottom right
On the new screen enter the below.
Tunnel: Select the tunnel you just created
Dynamic Endpoint: unselect this
Endpoint: Enter the Static IP of your wireguard server and for Port enter 51830
Keep Alive: 25
Public Key: Enter the public key generated on your wireguard server
Allowed IP: 0.0.0.0/0
Now hit save peer.

ow head to Interfaces > Assignments
At the bottom you will have “Available network ports” and a drop down on the right in the drop down select “tun_wg*” where * is the highest number as that should be the tunnel you just created. Now select add on the right.
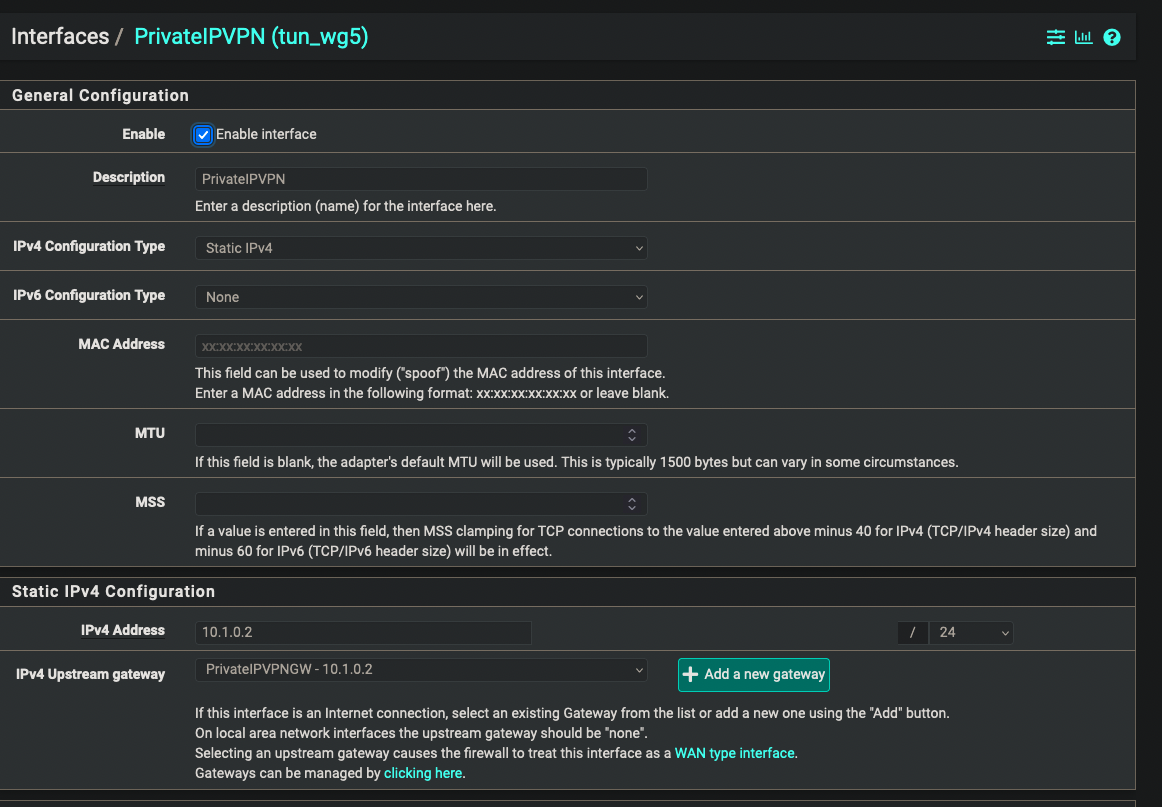
Now we need to configure the interface. You should have a tun_wg* above the Available network ports click on that and you will see the settings screen. Change the below settings.
Description: enter something meaningful for you
IPv4 Configuration Type: Static IPV4
IPv4 Address: 10.1.0.2 /24
IPv4 Upstream gateway: click add new gateway
On the menu that appears
Gateway name: something meaningful to you
Gateway IPv4: 10.1.0.2
Then click add this should add it to the IPv4 Upstream gateway
Now click save and that's the gateway set up time to set up the peer on the wireguard server.

Finishing up
Hopefully you are still connected to your wireguard server. Enter the below to get back to your wireguard config.
nano /etc/wireguard/wg0.conf
Now for the public key under peer enter the the public key from your PFsense firewall
Exit the file and save
Enter the below commands to reset the wireguard connection
Wg-quick down wg0
Wg-quick up wg0
Now if you look at your firewall in VPN > Wireguard under the status tab you should see an active handshake.
You now have a tunnel set up that will allow give you a static IP out to the world and also forward traffic sent to your static IP over 443 and 53, You should be able to figure out how change the ports if you need something else and you can route your traffic as normal.
I wrote this guide because i had not seen this use case and spent 2 days bashing my head against a wall trying to get it working. Thanks to the guys at Level 1 Techs for the help in resolving my issues finishing this project. Thank you for reading.