1st Post (Configuring a PFsense Router)

Its rare but the 1st post on a blog is really its 1st comment, so im going to start this with
1st!!!!
Now with the silliness (Bad joke) out of the way im going to get down to the meat and potatoes of this post Building and configuring a Pfsense Router. I am going to start off with the parts i used to build this router.
Antec VSK2000U3 Micro ATX Desktop Case
I found this to be a nice cheap case thats also quite compact which suits this application
Be Quiet TFX Power 2 300W Fully Wired 80+ Gold Power Supply
There is not that many people that make a TFX power supply so was happy to see Be Quiet had this offering
AMD Athlon 200GE 3.2GHz Processor
Decided on this because if i was under powered i could upgrade to a ryzen, Though after install and configuration this seems to be more than enough.
PNY CS900 120GB Solid State Drive
I originally had 2 of these intending to run them mirrored as a backup, However at this time PFSense does not seem to support the AMD Raid drivers.
Gigabyte B450M DS3H AM4 DDR4 mATX Motherboard
I chose this because i have had no issues with any Gigabyte motherboards i have, it was also a good price.
TP-Link TG-3468 PCIe Gigabit Network Card
If you want to run PFSense as a router you will need 2 network interfaces, It also appears that the card i chose has the same network chip-set as the motherboard which made assigning interfaces fun but more on that later
Corsair Vengeance LPX 8GB DDR4 2400MHz 1.2v DIMM Memory Module
You could do this with less ram but this amount allows you to run a ram disk and do initial writes of log and such to ram instead of continuous writes to your ssd. I have 2.5GB of my ram dedicated to this and it has been working quite nicely and gives me space to expand if i need to in the future.
The total cost of the parts in this list came to just under £300.
Now after these are assembled into a computer you will need a flash drive thats at least 2GB and have nothing on that you dont mind being deleted, then go to the links below.
Go to the link below and get either the portable if you are only going to use it once or the installer if you see yourself using this again
Then go the link below, select the AMD64 architecture and then USB Memstick Installer and Download.
https://www.pfsense.org/download/
Once you have both downloaded open Rufus and you should be greeted by the below window.

By default Rufus selects a flash drive if its inserted, so if you have more than one drive be careful and make sure the one selected is the one you want to use for this. Below Device you have Boot selection, click on the button to the right making sure to leave the drop-down as "Disk or ISO image (Please select)". Then locate and select the image you downloaded earlier. Once you hit start you will get the below message

Click OK, and Rufus will then make your USB stick into an installer for Pf-sense.
Now before you do this install you may want to make sure your motherboards bios is up to date and that the SATA controller is in AHCI mode. Once done insert your install USB and boot the machine and you will be greeted by this screen.

Click Accept to get to the next screen

By default install is selected and thats what we are going with.

Again go with the default, You can select ZFS but its an experimental feature so you cant blame anyone but yourself if you get issues.

Select the keyboard layout you use, then after this PFSense will install to the target drive.When complete you will get the below screen.

Select No, then you will be given the final screen to reboot your machine into its new OS.

On the first boot you are asked about which interface you want to be LAN and which you want to be WAN.With this setup both controllers are the same so to differentiate you can connect 1 adapter to something like a switch and identify that way.
Once the above step is completed connect a computer to the LAN interface, it should then be assigned an IP via DHCP. Open a browser and navigate to http://192.168.1.1 .
You will now have to go through the initial setup of your router. When you connect to the above IP you should be greeted by the below screen

The Username for first time setup is 'admin' and the password is 'pfsense'. You will then get 2 screens you can next pass as one is a read me and the second is trying to get you to buy support. both detailed below.


Now to the first screen where we need to change some settings.
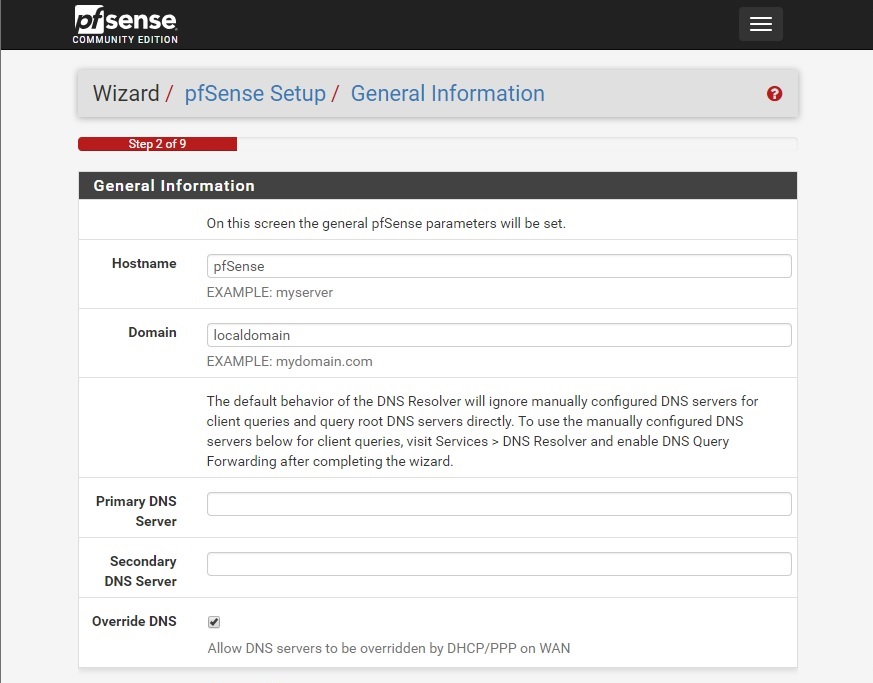
Hostname: this will be what you will call your router i went with the imaginative pfSense
Domain: the domain for your network if you are going to use one
Primary / Secondary DNS: I set these to 1.1.1.1 and 1.0.0.1 as its a nice private DNS Service.
Override DNS: un-tick this box as this will override your DNS to the broadband providers DNS and recently they have had a tendency to use your DNS queries for ad revenue and is often slower than the servers i mentioned above.
Now for the next screen.

Leave the time server as default and change the time zone to the one appropriate for the location in which you reside.

Now we have some options for your WAN Network. My internet provider is BT and for the time being i am on a home connection so i left these at default. there are also options to spoof your MAC address as i am aware some providers in the UK lock down your internet access to their routers.

The next screen allows you to set up the basic LAN settings. I am going to write another article about setting up VLANS on PFSense later so you may want to set this outside the scope of your VLANS as this will just be used for getting up and running. However if you will not be using VLANS set this to the IP address you wish to use and set the subnet mask to 24 to give you 256 available addresses.

Now we set the admin account password as leaving it at default is a bad idea.


Lastly we reboot the router with the settings we applied. and finish the basic setup with the router now ready to try some more advanced things later.